How to Save Your Leather Sofa: Ultimate Guide for Leather Sofa Repairs
ByCoconix ShoponDecember 14, 2021
Leather has been used by men since prehistoric times. Still to this day, we continue to use it for many different purposes. You often see it on shoes, bicycles, bags, cases, jackets, belts, sofa, motorcycle, and car seats.
This classic material is known for its durability, but like most things, wear and tear can happen. Luckily, with new technology we are able to fix it to a standard that is professional, affordable and quick! That’s when Coconix leather and vinyl repair kits can step in! Yes, leather is durable and it could last for many years. But when your leather has damages that badly need to be fixed, where do you go and how do you do it? What are things to be considered? How much should you be spending in this situation? So many questions right now in your mind and Coconix is here to answer all of them!
Leather has been used by men since prehistoric times. Nowadays, leather can be seen on:
Clothing
Accessories
Walls
Floors
Furniture
Seats
Tabletops
Door
Cabinet Hardware
This classic material is known for its durability but what do we do when this material is the one needing protection or fix? That’s when Coconix leather repair kits can help! Yes, leather is durable and it could last for many years. But when your leather has damages that badly need to be fixed, where do you go and how do you do it? What are things to be considered? How much should you be spending in this situation? So many questions right now in your mind and Coconix is here to answer all of them!
SECTION 2: Can I DIY Repair My Leather Sofa?
Every repair is unique so it’s crucial to be able to answer this question before starting, in this case, your DIY leather repair project: Can I DIY repair my leather sofa? There are three important things in our pre-repair checklist that you must tick first!
1. What are your Expectations?
First in our checklist in deciding whether to start a DIY leather repair is to recognise how flexible you are about your expectations. To move forward with the DIY process, you have to acknowledge that the results can only be as great as the time and effort that you put in. If what you are seeking is of strict quality, seeking professional leather repair help might satisfy your repair needs and expectations. However, if you do choose DIY leather repair, then this guide is here to support you the whole way through to achieve a seamless and cost-effective option to saving your leather sofa. Topical leather repair is no easy feat, but it is definitely worth the feat if you are willing to put in the effort!
2. Gauge if you can allot the time and effort for the project.
DIY leather repairs can be quick but there are projects that can be very time consuming. This will depend on many factors like the severity of your leather damage, your skills and experience, the availability of tools and products needed, etc. At Coconix, our repair experts provide free virtual personalized guidance to help you achieve professional results for DIY repairs, but you may still need to put in extra time and effort to achieve the best results possible!
3. Check and evaluate the severity of your leather damage.
This third question will help you make the final decision whether to DIY repair or not to DIY repair your leather sofa. For minor leather damages like pet scratches, cracks, small punctures, burns, fading, or discoloration, you can definitely do it yourself! For moderate damages like cuts, rips, peeling or holes, you can still do it yourself but these may require extra time and effort. For serious damages like torn seams, severe leather loss, large torn and depressed areas, you might have to seek the help of professionals. You wouldn’t want to worsen the damage of your leather sofa so DIY is not the best option for you. But, of course, it will always depend on your preference. If you’re a heavy DIYer, then you can probably face even severe damage!
SECTION 3: DIY Leather Sofa Repair Pros And Cons
If you’re still undecided whether to DIY or not your leather sofa, we think we know how we can help you further on this puzzle!
#1 PRO: SAVE MONEY!
This benefit of DIY leather repair is usually the reason why most people resort to DIY—to save money. Who doesn’t want to save their leather sofa without having to spend $200 - $2000, right? The price will always vary depending on your location, the severity of the leather damage, the part of the leather sofa that you want to have fixed, the size of your furniture, and so on. The next section of this guide will give you a rough estimate of how much you may have to spend on a leather repair so feel free to skip this part if you want to get an idea. So if at the moment, spending a huge amount of money is not an option, then DIY is the way to go!
#2 PRO: LEARN A NEW SKILL!
After it has saved you an arm and a leg for upholstery repairs, you may also find that you have acquired a new skill. Who knows, maybe this could be your hidden talent! Using DIY repair products will definitely make you think out of the box, and even think and act like a professional repairman. These new skills will help you not only in your future leather sofa repairs, but in any DIY leather repair projects.
#3 PRO: GET PRACTICAL!
If you have plenty of time, then you most likely have time and patience to spend on doing practical odd jobs like repairing your damaged leather sofa. Choosing this leather repair kit will equip you with simple tools to achieve the practical task of learning to repair things for yourself. Maybe your new hands-on approach might even become your new hobby! Don’t forget - not only will it be useful for now, but your new found love for DIY repair products may come in handy for any future projects you come across too. You might even be able to share it with others too! Especially once you have equipped yourself with the winning formula for successful DIY repair!
#4 PRO: GET SATISFIED AND INSPIRE!
Who would not feel satisfied seeing their own efforts work and look great? Who would not be satisfied saving money while discovering new skills and talents and inspiring other people? Satisfaction is a delightful benefit you can get from DIY leather repair projects. You can also inspire people to do their very own DIY projects. You can even start inspiring your family members or your neighbors. You can also show your friends the DIY projects you have finished and this might trigger their curiosity and start their own. You can help make people practical, creative, and innovative by being one yourself. If you fear that you’re alone and you might make irreversible mistakes, then you are truly wrong! At Coconix we help our customers get their desired repair results and assist them throughout their DIY repair. Whether it's a leather, vinyl, fabric or wood repair project, our customers (even beginners!) are very satisfied with the results of their repair project and often look for the next thing to repair!
#5 PRO: MAINTAIN YOUR HOME LEATHER FURNITURE YOURSELF!
The best thing about doing it yourself? You know that you can do it again next time and that you probably won’t ever need the help of a professional ever! And each repair you do, you’ll only get better! So, starting your little DIY car leather repair project now could also mean that you can become your own home leather furniture’s hero for a long time.
#6 PRO: EXTEND THE LIFE OF YOUR LEATHER COUCH
Did you know that the average person keeps a couch for approximately 7-10 years? After this, often the couch ends up in the landfill. This is what Coconix aims to improve! We want you to be able to add a few more years to your leather couch and maximize it beyond the usual life cycle of a leather furniture.
#1 CON: YOUR REPAIR MIGHT TAKE TIME!
This is not always the case, but we do like to caution this! Depending on the size of the repair and the depth of the damage, these factors can add time to the repair. Our products are made to be as easy and as stress free as possible but sometimes if repairing is new to you then the process can take more time! This is of course understandable but we just like to highlight that for best results its best to be patient and take your time!
#2 CON: VARIED REPAIR RESULTS!
DIY repair’s results greatly depend on many factors. We have listed below some possible factors that can affect the outcome of the repair:
Skills or repair experience
Time and effort available
Severity of the leather sofa damage
Preparations before starting the repair project
Repair environment and other external factors
These factors are not entirely definite as, again, every repair is unique. And whatever they may be, you must have realistic expectations for the outcome of your repair. In short, preparation is also a must!
#3 CON: SUCCEED OR LEARN A LESSON!
The last con that you may think about DIY leather sofa repair is that you either completely succeed or learn from mistakes along the way. This doesn’t sound really bad but we always want to succeed, right? We will always be available to guide you all throughout your repair project to achieve that success! If you’re only partly sure to go ahead and do it yourself, not to worry because we are here to help and back you up! You can chat or email us at support@coconix.com You can also call us at +1 (503) 400 33 03 from 9am - 10pm (Pacific Time). Our Coconix Support Team will be happy to help you with your repair and provide you with color matching and repair instructions.
SECTION 4: How Much Does It Cost to Repair a Leather Couch?
Single leather damage can cost anywhere from $95 to $150
For basic rips, cuts, and scratches of a three-cushion sofa, professional leather repair will cost you $550 to $1,200 This does not yet include the costs for labor which will add on hundreds more. Reupholstering your sofa is a really expensive repair that will cost you a lot, almost like buying a new furniture piece.
Why spend hundreds of your money when you can buy a leather repair kit for $19.95 which can cover large repairs and could even be handy for future leather repairs? Coconix Leather & Vinyl Repair Kit is the most affordable leather repair kit which can give quality, creativity, and convenience all at once!
Your money won’t be put to waste as this kit comes with easy-to-follow instructions and manual, and a leather repair expert (but she can’t fit in the box) ready to give you personalized advice!
So to conclude, seeking professional leather repair will cost you a realistic quality, experience and roughly $1,200. But with a DIY leather repair like Coconix Leather & Vinyl Repair Kit , it will cost you your expected quality, convenience and $19.95. Choose what’s practical, smart, and reasonable. Choose Coconix!
SECTION 5: Step-by-Step Guide on How to
HOW TO IDENTIFY THE DAMAGE OF LEATHER SOFA
Though leather can be a very durable and timeless material, it can also suffer minor to severe damages when exposed to different factors and used for a very long time. The good thing is, Coconix Leather and Vinyl Repair Kit can fix many of these damages and make them unnoticeable and less of an eyesore. We have listed these types for you and the causes of these damages.
MINOR DAMAGES
1. Scratches and Minor Pet Marks
Cause: This type of damage is caused by a variety of factors. It can be sharp-edged objects like metals, nails, pet’s claws, other furniture that may have scraped the leather material, and other external objects in the surroundings.
2. Cracks
Cause: This type is often caused by heavy pressure on the leather and also due to the material’s old age. This damage is typical on leathers with substandard quality.
3. Inks and Stains
Cause: This damage is due to other objects’ color adhering to the surface of leather material. This could also result from ink spills, paint, spray and other coloring materials that may have come in contact with your leather
4. Discoloration
Cause: An old leather’s color usually fades. But if your leather material is not that old and its color is fading or there’s discoloration in some areas, it might be due to direct exposure to sunlight or heat source. Discoloration can also happen if your leather is exposed to the skin’s sweat and grease and the hair’s oils. Harsh cleaning products like detergents and soaps could also lead to leather discoloration.
If you have any of these minor damages, then you’re in luck because Coconix Leather and Vinyl Repair Kit can fix them all. Scratches, pet marks, and even discoloration can be gone with our DIY leather repair kit!
SEVERE DAMAGES
1. Cuts, Rips, and Tears
Cause: These types of damages are caused by any sharp object or sharp-edged material that pierce through the leather surface. It can also be due to heavy traffic on the leather that can put the leather material on too much pressure. The cut, rip or tear can just be through the leather material itself or it can extend up to the leather’s backing material.
2. Peeling and Flaking
Cause: This damage is caused by a long period of heavy wear and tear and due to regular contact with skin grease and oils. It can also be due to liquids that come in contact with your leather. The leather fiber loses its structure and disintegrates.
3. Burns and Holes
Cause: Burns can be due to cigarettes or any flaming object that come in contact with your leather material. Holes can be caused by many factors. Some examples could be a pointed object piercing through the leather material, external factors like pets or kids unknowingly piercing a hole on the leather, or other furniture with pointy edges that could puncture the leather material.
4. Torn Seams
Cause: Torn seams and broken stitching can be caused by too much weight and pressure put on the leather. This damage can be repaired through manual stitching or machine sewing.
All of these severe damages except torn seams can be fixed with Coconix Leather and Vinyl Repair Kit. Our leather repair kit is not designed to repair seams since seams are high tension areas and the repair compound may just not be strong enough to hold the seam together for many years to come. Using strong fabric glue, or a leather sewing kit might deliver better results.
If you are still unsure which type of leather damage you have, you can send a picture of the damage to support@coconix.com and we’d be glad to give you personalized advice.
REPAIR PET SCRATCHES, PUNCTURES, and CRACKS
Materials needed:
Cotton swab/cotton pad (Alternative: Clean rag or cloth)
90% rubbing alcohol (Alternative: Water and mild soap)
Coarse to medium (60-150) sandpaper (for bumpy damages)
Fine brush, tooth pick, or any fine applicator (for finer applications)
Nail polish remover (Alternative for alcohol when buffing)
Leather Repair Kit
1. Prepare the damaged area.
It is crucial to remove all grime and dirt before starting the repair as the repair compound won't adhere well on a greasy surface and might flake off over time. Thoroughly clean the area to be repaired and its surrounding with a cotton swab or a cotton pad and 90% rubbing alcohol. Soak the cotton pad or cotton swab with 90% rubbing alcohol and gently apply it to the damaged area. Please firstly test the rubbing alcohol on an inconspicuous area to check that it doesn’t remove the color of your leather and proceed carefully. You may use water and mild soap as an alternative if the alcohol damages the surface. Soak a clean rag or cloth with mild soap mixed with water. Make sure that all the loose dust, dirt and grime has been removed first.
There are some cases when you will have to lightly sand the damaged area to make it flat and smooth before the repair compound application. This is required when there are bumpy edges of cracks or surface scratches that look etched. Anything that is bumpy, curling, or jagged has to be lightly sanded. Otherwise, it will stay bumpy and elevated after being repaired.
2. Match your leather color.
In order to completely blend the repaired spot, you will need to match the color of your leather or vinyl. It doesn’t have to be a perfect match but making it a very close match will help you get the best-looking professional repair results. Work during daytime so that you can clearly see the color of your leather or vinyl and compare it with the colors of the repair compounds available in your leather repair kit. If your leather color is one of the most common leather colors like black, tan, burgundy, cream, chocolate, or walnut, then you may be able to use one of the repair compounds straight from the tube. But if you have a little unique or complex leather color, you may need to mix two or more colors in order to achieve a close match. This step in the repair process can be a bit tricky and challenging but do not forget that you can always contact us if you need more tips, we are more than happy to provide personalized advice for your color matching! You can also check out our blog article for frequently requested color mixing recipes and you might find there your leather color match
For complex leather colors, decide first which will be your main color. Then, select your secondary colors based on the tint that your leather needs. Looking at your color mixing guide will greatly help you in the color matching process! This color mixing guide should be included in your leather repair kit but if you did not find this in your kit, please contact us so we can send you your own copy! You can also download it for free for quicker access. Once you have your main and secondary colors, carefully mix them in the mixing jar. We recommend adding only very tiny hints of each color at a time as a little amount goes a long way. You may adjust the shade of your color mixture by adding white or black repair compounds. Try your mixture on a small, inconspicuous area and wait until it fully dries. Please be patient and make small adjustments until you get the color just right.
3. Apply a thin layer of compound.
After matching your color, apply a thin layer of the repair compound to the damaged area. For this step, you will need the spatula or the brush included in the kit to evenly apply your color mixture. If you need to do finer application, especially for smaller and more intricate damages, we recommend using a toothpick, a fine brush or any fine applicator that is suitable for your repair.
4. Allow the compound to dry for several hours.
Drying time depends on the thickness of the applied layer and the relative humidity of the environment. It usually takes a few minutes to an hour for small repairs to completely dry. For medium to large repairs, it may take an hour to a few more hours for the repair compound to fully cure. When doing your repair project, the temperature should be above 50°F ideally.
For these types of damage, it usually only requires 1-2 coats of the repair compound to completely cover the damage. However, for some cracks or small punctures, you may need to apply multiple thin layers to rebuild the damaged area until it is level with the surrounding area and completely covered. Please allow drying time between each layer application. The repair compound is not only paint, but it also contains leather filler and adhesive and dries to a leather-like finish. The repair holds very strong, often outliving the actual material.
If you encounter any drying issues with your repair project, try the next step immediately. If the next step does not solve your issue, please contact us right away and send a photo of your repair’s current state.
5. Buff and blend the repaired spot.
When the repair compound is dry, use a cotton pad or a cotton swab with 90% rubbing alcohol to buff the edges. Carefully blend the edges of the repaired area to match it with the rest of the leather. Buffing it with alcohol will also remove any stickiness or tacky feel left in the repaired area.
If 90% rubbing alcohol does not remove the stickiness or tacky feeling, check the rubbing alcohol you are using. Please make sure the alcohol is not expired, as it affects the outcome. Alternatively, you may use nail polish remover. We recommend using a cotton swab to carefully rub the repair compound only, as the nail polish remover may remove the color of your leather.
Once you have buffed and blended the repaired spot to your liking, please take a photo of your successful repair results and share it with us and your DIY community! We’d love to hear about customers achieving their desired repair results!
REPAIR FADING, STAINS and DISCOLORATION
Whether the fading, discoloration, or stains, is from years of use, everyday wear and tear, or just neglect, your leather can still be saved. Firstly, DIY leather repair saves you from discarding a perfectly good piece of upholstery and secondly, it saves you from the extensive costs that can amount from getting it professionally reupholstered. For top quality leather, the color can usually be restored by just rubbing some leather moisturizers. But usually, this is not the case. You can do the touch-up on your leather with the help of the repair steps we have prepared for you below.
Materials needed:
Cotton swab/cotton pad (Alternative: Clean rag or cloth)
90% rubbing alcohol (Alternative: Water and mild soap)
Fine brush, tooth pick, or any fine applicator (for finer applications)
Nail polish remover (Alternative for alcohol when buffing)
Leather Repair Kit
1. Clean and remove grime and dirt.
Since you are working on the surface of the leather, this step is a very important part of the repair. Carefully and thoroughly clean the damaged area with a cotton swab or a cotton pad and rubbing alcohol. Please first check if the rubbing alcohol removes the color of your leather and then proceed carefully. If the leather color is affected by alcohol, please only use water and mild soap when cleaning. Make sure that the spot to be treated has been thoroughly cleaned as it will help the repair compound adhere well to the leather surface.
2. Mix, match, and adjust your color mixture.
Your goal for this repair project is to “get the color back” of the faded, bleached, discolored, or stained spot. So, you will have to spend more time matching the color of your leather. We recommend trying your color mixture first on a small inconspicuous area and waiting for it to dry. This way, you will know what colors to add and if the shade needs to be adjusted by adding hints of black and white to your color mixture
3. Apply and let dry.
After matching your color, please use any type of applicator, such as a sponge, a cotton applicator or a brush to apply a thin layer of compound to the discolored area. Make sure that you are careful when applying each of the layers, as you are working on the leather surface and you wouldn’t want to create a bumpy or elevated spot by using too many layers of the repair compound. Allow the compound to dry for several hours. When the compound is dry, use a cotton pad or a cotton swab with 90% rubbing alcohol to buff the edges.
If you encounter issues with this type of repair, especially if your leather fading and discoloration covers a large area, you can contact us and send a photo of the damage. We would be more than happy to assist and give you personalized repair advice!
REPAIR PEELING AND FLAKING
Surface damage such as peeling or flaking of the leather usually happens on leather or vinyl that is not 100% genuine leather. If your leather or vinyl is a bonded substance, with a synthetic-like coating on the surface, it will eventually peel or flake even after taking the proper maintenance steps and using the right products. Don’t be fooled by a “Genuine Leather” tag on your upholstery as there are no standards in place that sets how much or what type of leather needs to be present to qualify for the said tag.
But don’t be discouraged or even think that your peeling leather or vinyl is not repairable! Because it is! As we have shown and described in the previous section, peeling or flaking leather can have mild to extensive leather loss. And though it does not go all the way through the backing fabric, the leather loss can be a huge eyesore. Because of this, you will have to set your own expectations of the possible repair results. This type of leather repair requires a bit more time and patience to get the best results possible. Follow the steps below carefully and if you ever encounter repair issues or concerns, please do not hesitate to contact us for further assistance.
Materials needed:
Scissors/knife/cutter
Coarse to medium (60-150) sandpaper (for bumpy, jagged peeling)
Cotton swab/cotton pad (Alternative: Clean rag or cloth)
90% rubbing alcohol (Alternative: Water and mild soap)
Leather cleaner or leather conditioner (for shiny finish)
Leather Repair Kit
Kit
1. Trim and clean.
Prepare the damaged area by trimming any curling edges or jagged bits with scissors, knife, or cutter. Make sure that the damaged area is flat, smooth, and ready for the repair compound application to avoid any repair bumps or elevated areas. For very small peeling areas or several flaking jagged bits, you may use fine sandpaper to make the damaged area flat and smooth before the repair. You may use any gauge between the coarse to medium (60 -150) sandpaper grits depending on your preference. For repairs with a largely peeled or flaked leather that is flapping, you should first use some repair compound under the edges and try to stick them down. Anything that stays bumpy or curling after that has to be trimmed. Otherwise, it will stay bumpy or curling after being repaired. Then, clean the area with a cotton swab or a cotton pad and rubbing alcohol. Don’t forget to first check if the rubbing alcohol removes the color of your leather and proceed carefully. If alcohol removes the color of your leather, use water and very little amount of mild soap to clean the area.
2. Match and apply.
Use the color mixing guide to determine the colors you need for your repair project. You may have to mix two or more colors especially when your leather color has a unique shade. We recommend testing your color mixture on a small inconspicuous area first and wait for it to dry. Adjust the color accordingly. It is very important to find the closest color that will easily blend with the rest of your leather especially when the peeling or flaking covers a large area. Finding the best color match will help you get the best results possible. After matching your color, apply a thin layer of the color mixture to the damaged area.
3. Allow some dry time and apply more coats as needed.
Allow the compound to dry for several hours. As always, we recommend doing your repair project on a temperature above 50°F ideally. For slight peeling, you may just have to apply 1-2 thin layers of repair compound. But for more serious flaking or leather loss, you may need to apply multiple thin layers to rebuild the damaged area until it is level with the surrounding area.
4. Buff and blend carefully.
Make sure the repaired areas are completely dry before buffing. Then, use a cotton pad slightly soaked with 90% rubbing alcohol to buff the edges. For smaller, more intricately treated areas, we recommend using a cotton swab to carefully rub the repair compound only, as the alcohol may damage or discolor your leather. If your bonded leather is sensitive to harsh products, please use leather care products such as leather cleaner or leather conditioner. Applying leather conditioner should make the treated area shinier.
Bonded or faux leather will eventually peel with use, but you can definitely extend its life by carefully following the steps above. If we helped you keep your leather for another few months or years, please share with us your before and after repair photos! Our DIY community would surely learn and be inspired by your repair results!
REPAIR BURNS and HOLES
Burns and holes are usually very tiny but often the smallest impact can be very noticable in car leather interior. These are usually damages that happen in an instant like a cigarette touching your car leather surface, a sharp or pointed object that poked through your pocket into the leather, or simply an ash that fell and burned your leather. These damages don’t have to be fixed by a professional as you can restore the damaged spot by carefully following the steps below.
Materials needed:
Scissors/knife/cutter/scalpel
Cotton swab/cotton pad (Alternative: Clean rag or cloth)
90% rubbing alcohol (Alternative: Water and mild soap)
Leather Repair Kit
Backing cloth (included in the repair kit)
Any sturdy fabric such as canvas or denim (if repair requires more)
1. Trim the surrounding jagged or burned edges.
Prepare the damaged area by trimming any jagged bits, curling edges, or burn marks with scissors, cutter, scalpel, or a knife. Next, please clean the area with a cotton swab or a cotton pad and rubbing alcohol. Please check first if the rubbing alcohol removes the color of your leather and proceed carefully. Use water and mild soap as an alternative for cleaning if alcohol removes the color of your leather.
2. Determine if backing fabric is needed.
If the burn or hole has also damaged the backing material of your leather, then you will have to use the backing fabric included in your repair kit. You can also use any sturdy fabrics like denim or canvas. If the backing of your leather is still intact, please skip this repair step.
Cut out a piece of backing fabric with rounded edges and larger than the hole. Carefully insert it into the hole with the help of the spatula. Make sure that the backing cloth is flat and positioned in the right place. The backing fabric will hold the repair together and help keep it strong and intact over the years.
3. Match and fill the hole.
For the damaged spot to be less of an eyesore, you need to find the closest color match to your leather. After matching your color, please fill the compound under and along the edges of the hole to ensure that the backing fabric is glued well into position. If your repair did not require a backing fabric, please fill the compound directly into the hole. Work your way from the outside to the center of the hole and level the surface. Be particularly careful as to avoid getting too much compound onto the intact material.
4. Rebuild, dry, and blend.
Allow the compound to dry for several hours. You may need to apply multiple layers to rebuild the damaged area until it is level with the surrounding area. Please allow dry time between each layer application. When the compound is dry, use a cotton pad or a cotton swab with 90% rubbing alcohol to buff the edges. Blending the repaired area in with the rest of the leather will help make the treated area almost or completely disappear.
To avoid these kinds of damages from occurring again, it’s best to avoid bringing or allowing cigarettes and sharp objects inside your car. Prevention is always better than a cure.
REPAIR CUTS, RIPS and TEARS
These types of repairs, as we showed and described previously in IMAGE 3, range from simple to severe cases. For simple cuts, you would only need a very small backing cloth or sometimes, none at all. We have an instructional repair video for simple cuts and tears that can easily help you throughout the repair process! For more complicated damages, you can still repair your leather by carefully going through the steps below.
Important Reminder: If your leather has a seam tear, a rip along the stitches, a severe and large cut that has also cut through the foam underneath, or a damage with severe leather loss, you will not be able to repair your leather using a repair kit alone. Unfortunately in these instances the repair compound may not be strong enough to hold the seam or the damaged area together for a long period of time. Using a strong fabric glue, a leather sewing kit, leather adhesive patch, or a leather sewing machine might deliver better results. Your leather may also need professional reupholstering if the damage is one of the examples given in IMAGE 8 in the previous section./p>
Materials needed:
Scissors/knife/cutter
Cotton swab/cotton pad (Alternative: Clean rag or cloth)
90% rubbing alcohol (Alternative: Water and mild soap)
Leather Repair Kit
Backing cloth (included in the repair kit)
Any sturdy fabric such as canvas or denim (if repair requires more)
1. Remove all dust, dirt, grime, jagged edges, and excess threads.
Clean the damaged area thoroughly. Use a cotton swab or a cotton pad and rubbing alcohol. If alcohol is not compatible with your leather, you may use a clean rag or cloth soaked with water and little mild soap as an alternative to clean the area. Make sure that all the loose dirt, dust and grime are cleaned as this step will help the repair compound adhere well to your leather material, especially when the cut or tear covers a medium to large area. Then, trim any curling edges, jagged bits, and excess threads. This will help you have a smoother and more blended repaired area later. Make sure all bumpy edges and threads that are sticking out are removed as this will affect your repair outcome.
2. Insert the backing fabric into the tear.
Cut out a piece of backing fabric with rounded edges and larger than the tear. Your leather repair kit should include the backing cloth for your repair. If your repair project requires more, you may use any sturdy fabric like canvas or denim.
Note: If your cut, tear, or rip did not cut through the backing material of your leather and it is still intact, you may skip this step. If you are not sure if your repair needs a backing cloth, you may contact us and send us a clear photo of the damage. We’d be happy to give you our personalized advice.
After cutting the right size of your backing cloth, insert it into the cut or tear and under the torn backing with the help of the spatula. Place the backing cloth properly and make sure the entire cloth is flat and in the correct position.
3. Find the right color match for your leather.
We recommend taking this step very seriously as most cuts and tears are large and located on very noticeable spots. If you need advice on color matching, just let us know which repair kit you have and send us a photo of your repair taken under natural lighting. It is best to choose a photo that best represents your leather color so we can provide you with the correct color matching instructions.
4. Secure and fill the tear
After matching your color, please fill the compound under and along the edges of the tear to ensure that the backing fabric is secured and well glued in position.
The repair compound is not only paint, but it also contains leather filler and adhesive and dries to a leather-like finish. The repair holds very strong, and often outlives the actual material.
Then, please fill the compound directly into the tear. Work your way from the edges of the tear to the center and level out the surface. Please avoid getting too much compound onto the intact material.
5. Let dry and buff the edges.
Allow the compound to dry for several hours. You may need to apply multiple thin layers of the repair compound to rebuild the damaged area. Applying multiple layers of the compound for each application generally provides the best results. The repair should last longer if you repair the damage with several thin layers of repair compound.
When the compound is dry, use a cotton pad or a cotton swab with 90% rubbing alcohol to buff the edges.
Remember to apply multiple thin layers to your damaged spot. It will help your repair project stay intact and durable for a few more years.
SECTION 6: How to Add More Years to the Life of Your Leather Sofa with a Leather Care Routine
There is a lot of information available about how to take care of your leather. We want to bring insights into this topic and dismiss some popular myths wandering around the internet, such as cleaning with hairspray, baking soda or simply moisturizing with vaseline. If you want to extend the lifespan of your leather furniture and automotive leather, then keep on readin
3 Simple Do’s of Good Care
Dust your leather with the same regularity as you dust other items in your home. Make it a habit when dusting other items in your home like wood furniture, to also dust your leather couch.
Clean your leather only if it can be categorized as finished. You can test this by applying a drop of water in an area out of sight. Wait for 1 minute. If the water soaks right through or leaves a dark mark, your leather is unfinished and should only be cleaned by a professional. If the water droplet stays beaded up and does not leave a mark, your leather can be classified as finished and you can use any cleaner labelled suitable for furniture.
Moisturize your leather 3 to 4 times per year and it can add years or even a decade to the life of your leather. Use product labelled as suitable for leather upholstery for your couch and avoid products with harsh chemicals or acidic pH.
3 Simple Don’ts of Good Care
Never use hand or body moisturizers. It lacks the crucial moisture and locks in dryness. Your leather will remain oily and potentially leave residue on your clothes.
Never use window cleaner, hair spray or hand cleaner. They are solvents of your leather color and remove the protective clear top coating. If you use it too often and too aggressively, it may even remove all color from your leather and expose the raw leather underneath.
ever use home remedies commonly believed to be helpful, such as vinegar, baking soda or products for imitation leather. Even though these products seem harmless, their harming effects unfold delayed and gradual. They may clean the surface, but will soak into the seams and cracks of your leather, thus accelerating the aging process.
With these simple Do’s and Don’ts, you’ll be able to extend the life of your leather by a long time.
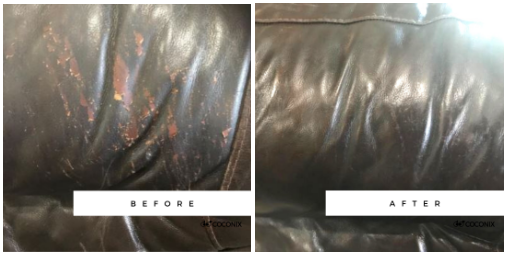
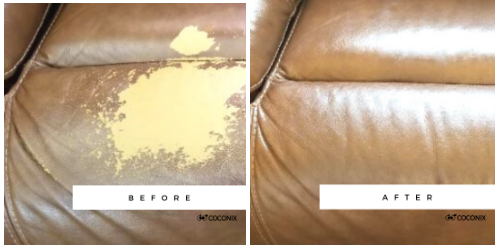
SECTION 7: 5 Exclusive Before & After DIY Leather Sofa Repair Photos
1.
“Great product-wonderful customer service!”
By Donna on September 11, 2019
“The product worked wonderfully and the individualized customer service was superb! I had a few questions about my project so I emailed pictures to them. Maria was very prompt in responding (even over the Labor Day holiday). She answered my questions and addressed my concerns mainly about texturing the larger area of my sofa. I didn’t want it to look like I had “painted” over the cracked and peeling surface. She was right that the product dries with a textured look and feel. Pictures show before and after of the area I treated. I also had areas on the back of recliners where they had rubbed against the wall. The damage was pretty deep but the product filled
2. “It works!”
by Cory on October 9, 2019
“I did not expect this to work so well! Take your time getting the right color and it is as close to magic as you can get haha! Definitely gave us more life to our old favorite couch!”
3. “Great Product, saved the couch.”
by Alina Bezdikian on August 20, 2019
“I used Coconix's leather repair kit to help with some cracking on my leather couch. I think it did an excellent job. Of course you need to be diligent on mixing your colors and trying to match to the original, but if you put in some effort, it really helps. Included is a document meant to teach you how to match the color and once you do, the product is helpful hiding cracks. I don't think a large tear could necessarily look fully back to normal, but little ones definitely get hidden with this product. Also, I found layering - and waiting long periods for it to dry in between - helped a lot. I would recommend! *in my photos you can see the difference but I did want to make clear the middle cushion I switched out with one from the love seat. I used the product on that cushion as well, it was in bad shape, but didn't have the whole and patch from the cushion in the before photo.”
4. “Easy to use!!!”
by Susan Mullins on August 22, 2019
“Great product. Would buy again. My dog left big scratches in my leather couch and now you can’t even see it.”
5. “Couch is like new!”
by Solara Antonopulos on August 11, 2019
So, this couch is only about 4 years old and still under warranty. I had this area professionally repaired a few months ago, and the finish started flaking more than ever! While the repair was free, it is a pain in the rear, so I tried this product! It worked awesome, looks like new! The brush that comes with the kit left brush marks, so I used an old soft artistry brush to apply. I also used a makeup sponge to blend at the edges and to fill in the smaller worn areas. Took three thin coats, drying in between to get it just right. When mixing, shiit for a slightly lighter shade, as it darkens as it dried. Time will tell if it holds up, but at least I have extra product left over if I need to reapply!"
SECTION 8: Conclusion
We will never get tired of saying how unique every repair project is. But we will also never get tired of helping first timers and DIYers like you get the best leather repair results possible! First and foremost, we want this guide to provide you with the correct tools and steps to step into your highest DIY potential and give you the best outcome possible for your leather repairs. So, we want to turn it over to you: what did you think about this ultimate DIY leather sofa repair guide? Is there something you think that we have missed or do you have any other burning questions or unique repair issues and concerns, then please do not hesitate to let us know by leaving a comment below!
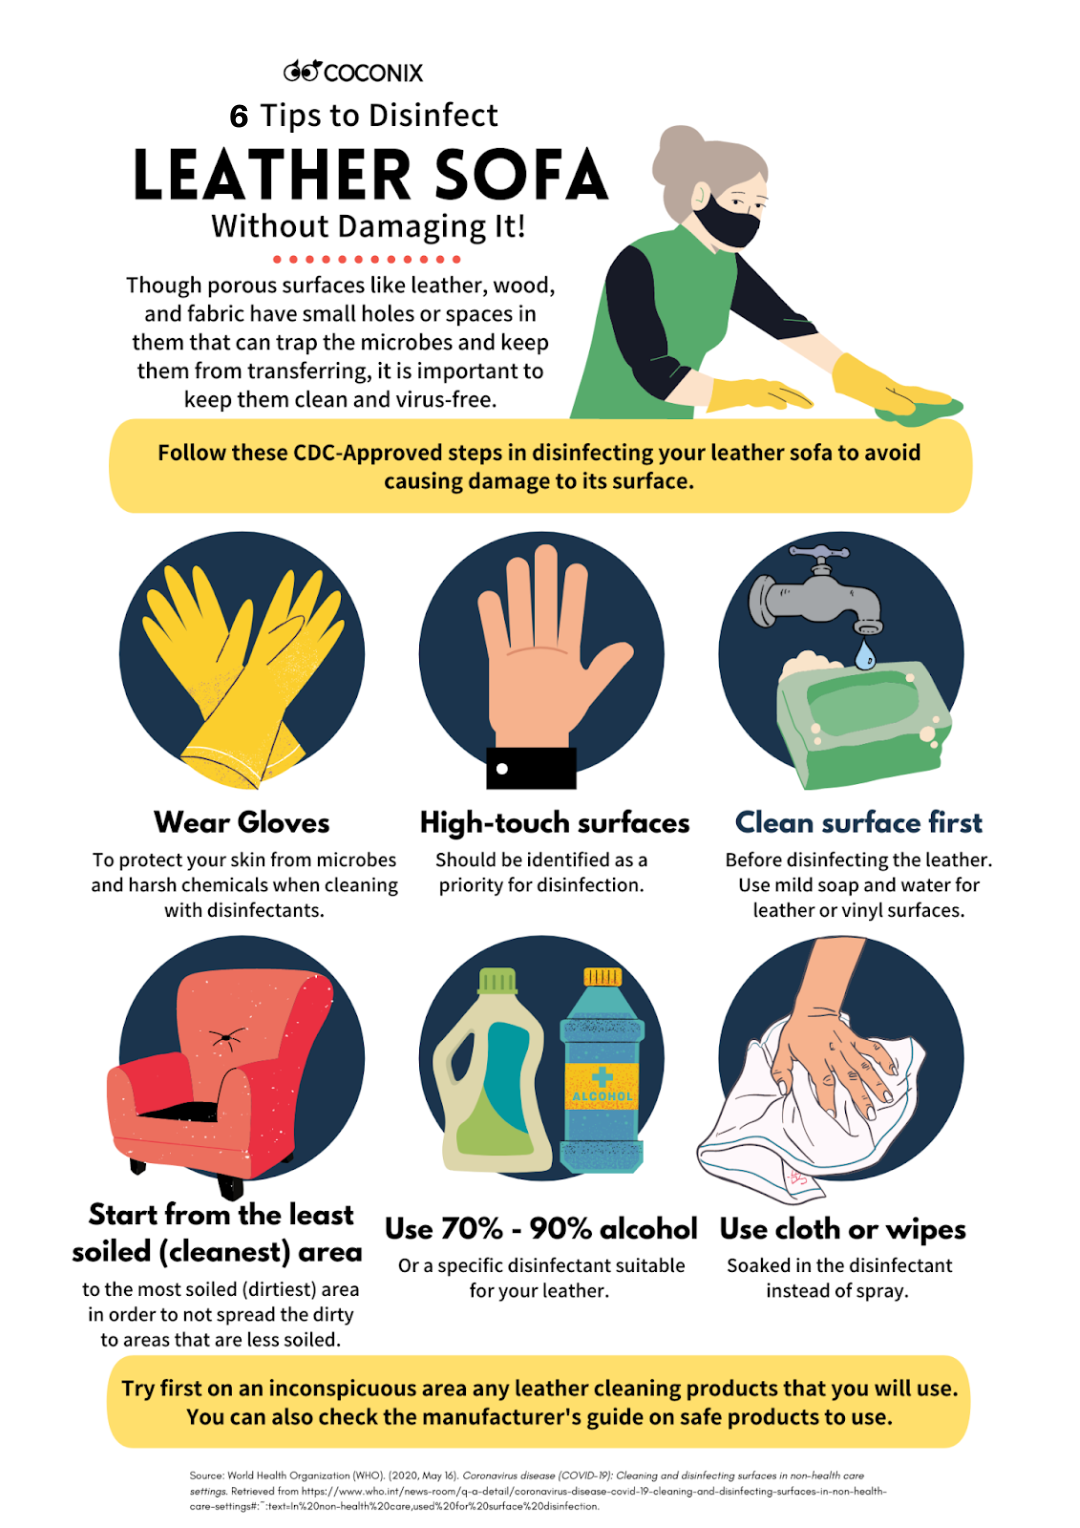
SECTION 9: Bonus! 6 Tips to Disinfect Your Leather Sofa Without Damaging It!
Understand the importance of regularly disinfecting your leather sofa with these 6 essential tips, ensuring both the longevity of your luxurious furniture and the wellbeing of your home environment
Coconix Learning Hub
Get ultimate repair guides, step-by-step video tutorials, free repair eBooks, and more!
Tired of Throwing Things Away?
Join the Coconix Repair Hub – It’s Free!
Learn how to save money, rescue your favorite items, and transform old into new.
Get expert tips, step-by-step tutorials, and creative repair ideas delivered to your inbox.