How much does it cost to fix a water damaged wooden cabinet?
Fixing a water damaged wooden cabinet professionally can be quite costly. You would need to hire a professional carpenter or furniture repair specialist, and they would likely charge by the hour. The cost could range anywhere from a few hundred to several thousand dollars, depending on the extent of the damage and the skill level of the professional you hire.
Coconix repair kits are the best choice!
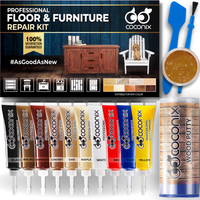
On the other hand, using the Coconix Floor and Furniture Repair Kit to fix your water damaged wooden cabinet can be a more affordable option. The cost of the kit is significantly less than hiring a professional, and you can save even more money by doing the repair yourself. Plus, you'll have the satisfaction of knowing that you did it yourself!
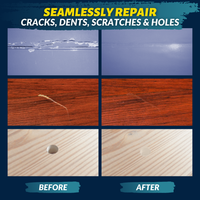
It's worth to mention that, Coconix Floor and Furniture Repair Kit is a professional product that comes with all the materials and instructions you need to complete your repairs, so you can be sure that you'll achieve professional results. With the Coconix Floor and Furniture Repair Kit, you'll be able to fix your water damaged wooden cabinet and have it looking like new again, without having to spend a fortune!
Difficulty:
While the repair process is relatively easy, it is still important to exercise caution and pay close attention to the instructions provided in order to ensure a successful outcome.
Time Required:
The time required for this repair will depend on the size and severity of the water damage on your wooden cabinet. In general, it can take anywhere from a few hours to a full day. But trust us, it's worth the wait to have your cabinet looking like new again.
Sandpaper (if needed)
Step 1
Preparing the Area
- Carefully remove any paint chips or wood splinters from the damaged area.
- Clean the area and remove any debris.
- Wipe down the area with a damp cloth and let it dry thoroughly.
Step 2
Filling the Water Damage
- For water damage larger than 1/4 of an inch, use the wood putty to fill the damaged area on the wooden cabinet.
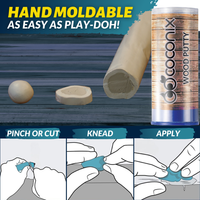
- Cut off the required amount of wood putty and knead it until it becomes a uniform color.
- Apply the putty within 2 minutes after kneading. Press the putty firmly into the damaged area until curing is noticeable. Do not leave a bulge.
- For a smooth surface, rub the area with a damp cloth prior to hardening. After 1 hour, the wood putty can be sanded, tapped, and drilled.
Step 3
Matching the Color
- If your repair requires a custom color, refer to the Color Mixing Guide found in the kit to match the color of the wooden cabinet and prepare the mixture in the empty mixing jar.
Step 4
Applying the Repair Compound
- Apply the repair compound to the damaged area. Start by applying it around the edges of the water damage and work your way towards the center to avoid air bubbles.
- Use the spatula for larger applications and the brush for surface applications and detail touch-ups.
- Smooth out the surface and wipe off the excess with a paper towel.
Step 5
Drying and Additional Layers
- Allow several hours for the repair compound to dry until it is no longer sticky to the touch.
- If needed, apply additional layers until the repaired area is level with the surrounding area of the wooden cabinet.
Step 6
Adding Texture (optional)
- If your wood has grain patterns, designs, or texture, you can recreate them using the small brush and dark colors like Walnut, Mahogany and Black.
Step 7
Maintenance
Avoid placing any wet items directly on the cabinet surface, as this can cause discoloration or warping.
Use coasters or placemats to protect the cabinet from scratches and spills.
Dust the cabinet regularly with a soft cloth or brush to remove any dirt or debris.
Use a mild cleaning solution and a damp cloth to clean the cabinet surface. Avoid using harsh chemicals or abrasive materials.
Apply a coat of furniture wax or sealant to the cabinet surface to protect it from scratches and spills.
Keep the cabinet away from sources of water to prevent future water damage.
And that's it! Your water damaged wooden cabinet has been successfully repaired and is ready for use. Show off your handy work to your friends and family next time they come over. Don't forget to visit coconix.com/resources for more tips and tricks on furniture repairs. Happy repairing! Remember to handle your cabinet with care and avoid placing any wet items on it as it may get damaged again. With proper care and maintenance, your cabinet will last for years to come. Enjoy your newly repaired cabinet and the satisfaction of a job well done!
One Repair Leads to Another
Besides the Floor and Furniture Repair Kit, Coconix also provides solutions for other repairs around your home. The Fabric and Carpet Repair Kit is perfect for fixing holes, tears, and burns on carpets, rugs, and upholstery. It comes with a variety of colors of fabric and carpet repair compound, and easy-to-follow instructions. You can use this kit to fix damages caused by pets, kids or general wear and tear, and give your carpets and upholstery a new look.
The Leather and Vinyl Repair Kit is another great option, perfect for fixing scratches, cuts and holes on leather and vinyl furniture, car interiors, and clothing. It comes with a variety of colors of leather and vinyl repair compound and easy-to-follow instructions, which makes the repair process simple and straightforward. With this kit, you can restore the look and feel of your leather and vinyl items, and make them look new again.
Both the Fabric and Carpet Repair Kit and the Leather and Vinyl Repair Kit are easy to use and come with all the necessary tools and materials. They are designed for anyone, regardless of their repair experience. With Coconix, you can tackle any repair project with ease and confidence, saving you time and money by eliminating the need to replace damaged items.