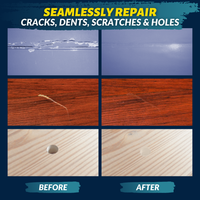
How to repair a scratched wooden dining table?
Your dining table tells the story of your family—gatherings, meals, and celebrations—but scratches can leave it looking less than its best. Whether caused by overzealous children, heavy dishes, or everyday wear and tear, these marks can tarnish the table’s beauty. Thankfully, repairing a scratched wooden dining table is easier than you think. Let’s dive into how you can bring your table back to life and let it shine once more as the centerpiece of your home.