Pets Vs Home Furniture: Pet Owners' Ultimate Repair Guide for Furniture Damages (Plus 5 Awesome Pet Damage Repair Results!)
ByCoconix ShoponDecember 14, 2021
Pets, for many of us, are part of the family and we love them as much as our family members. However, even the most well-behaved ones can cause damage within your home, especially on your precious furniture pieces. Scratches on your new wooden table or chew marks on your leather couch both sound like a horror movie, at least for your home furniture. That’s where this ultimate repair guide we have formulated comes in handy. This ultimate repair guide will hopefully help you in dealing with your pet damage and deciding if DIY repair is the solution to your pet problems.
SECTION 1: What’s Up With My Pet?: Destructive Pet Behavior Causes
Before we dive into the nitty-gritty of DIY pet damage repair, let’s first look into the source of the problem: your furry pet. Your pet’s destructive behavior has an underlying reason, ranging from simple to severe ones. It’s important to attend to this matter first before anything else as solving your pet’s destructive behavior will prevent any further damage to your home furniture or any part of the house.
CAUSES
Your pet may have severely destructive behavior but it doesn’t mean that they are bad doggos and bad kitties. The following are the most common reasons they have this behavior:
1. Breed Heritage: There are breeds of dogs that inherited the “go to ground” or the digging behavior. Digging is a natural and expected behavior for them, as their ancestors were in the wild.Northern breeds like Siberian Huskies love to dig and create safe, comfy places to sleep, as their ancestors were in the cold, freezing Northern countries. These breeds burrow into the snow for warmth or dig the soil for cool nap spots.
2. Searching and Sniffing: Small bits of stray foods or any solids that they may have sniffed may cause your pet to dig and search for it in between your couch’s cushions. Our pets, like us humans, also like to keep their favorite toys safe. They tend to put it into a “safe place” and this can also, in turn, result in them digging your precious furniture looking for their treasure.
3. Marking Their Territory: This is especially true for cats. They scratch to mark their territory by leaving both a visual mark and a scent as cats have scent glands on their paws.
4. Fleas or Bugs on Furniture: If you’re letting your furry pal sleep on your furniture and they get attacked by fleas or bugs living in those pieces of furniture, then they will most likely dig, search, and scratch their paws and claws into your precious sofa. They won’t stop until they find those biting bugs or creepy-crawly sounds that they might be hearing or sensing.
5. Finding Comfort: Pets are like us. They like to find their happy, comfy place. And this process includes them scratching, digging, or clawing your furniture. This behavior of our pets is like us when we fluff our bed and make our pillows plump.
6. Unintentional Reward: Your pets may have mistaken your laugh as a reward for his destructive behavior. You may also have tried to chase them away and they may have taken this as you play with them. This can, in turn, be a habit for your pet.
7. Seeking Attention: Our pets will always want our attention and they have numerous ways to get it. One of those ways could be scratching, digging, or clawing up your home furniture. Their destructive behavior does not always mean that they're naughty, sometimes they just want you to pay attention to them or give them a bit of your time for a belly rub or hug.
8. Boredom or Anxiety: One of the possible reasons for your pet’s destructive behavior is they are just plain bored. This can happen when they are left alone for long periods of time. Anxiety could also be a factor as there are pets who suffer from separation anxiety when left by their owners.
9. Parasites: Ticks and fleas can also be a factor in why your pet is scratching your furniture. If you can’t see any, then it could be possible that they have mites. Mites are a fairly common health concern for dogs. They are parasites that live in the fur, or sometimes in the ears, and can make life uncomfortable for your dog.
10. Medical Reasons: Your pet may also be undergoing some serious medical conditions. If you notice your pet has been peeing on your couches which he was not doing before, your pet may have a bladder infection, stones or crystals in kidneys, and other serious medical reasons. Consulting your pet’s veterinarian will help you rule out any medical factor.
HOW TO IMPROVE YOUR PET’S BEHAVIOR
You can start with solving this issue by trying the following steps to improve your pet’s destructive behavior.
1. Don’t get angry.
Animals have very short memories (even for a few minutes only!) so they will not completely understand your yell, anger, or other punishment, according to the experts at the American Society for the Prevention of Cruelty to Animals (ASPCA). It is advised to only punish them if you caught your pet doing the bad deed or behavior in the act, not after it happened.
2. Correct your pet the right way.
Catching your pet in the act does not mean that you should get angry, yell, or shout. This is never a good way to improve your pet’s behavior. This can only make them confused about what’s happening. It can also lead them to scratch or chew other things, adding more damage to your home. When you catch them in the act, calm down and never freak out. What’s recommended is to lightly touch them as a sign of correction on the neck or hindquarters. This should get your dog’s attention away from the object they are destroying. Then, communicate to your dog that the object they are destroying is yours using your body language.
3. Check your pet’s health.
You should also look into your pet’s health and well-being as these can also be factors in their destructive behavior. According to the ASPCA, a dog may soil indoors due to incontinence problems, changes in diet, medications, age-related difficulties, gastrointestinal upset, or anxiety issues. Frequent chewing and scratching may have underlying medical reasons so it’s important to talk to your vet about it.
4. Infuse the damaged area with scents.
Since dogs and cats have extremely sensitive senses of smell, use these against them to prevent them from enjoying scratching, clawing, or chewing your home furniture. For dogs, furniture and other items can be coated with a taste deterrent (such as Bitter Apple) to make them unappealing. For cats, use a feline pheromone spray and spritz in the area where your cat has been scratching. These products aren't marketed specifically for this purpose, however, according to The Spruce Pets, cat behaviorists have found that the "friendly pheromones" in these products can fool cats into believing the area has already been "marked" by another cat, often discouraging scratching behavior.
5. Play with your pet more.
You being here, reading this ultimate pet owner’s guide to home furniture damage only means one thing: you’re a great fur mommy or fur daddy! We’re quite sure that you love your pet more than anything else, but, extra time for a catch, play, or belly rub would do your pet a great deal. Engaging more with your pet will help them release their energy and also exercise their brain. Playing with them and making them tired means that they won’t have time to get bored and destroy your home furniture.
These methods are only some of the ways you can improve your pet’s behavior. There are a lot of things you can try that are the most effective and preferable to you, to your home, and to your pet.
SECTION 2: DIY Pet Damage Repair Meter
When your pet has already damaged one or more of your home furniture, you have three usual options for this kind of situation: DIY repair it, hire a professional to repair it for you, or throw your furniture away and buy a new one. DIY repair is the most inexpensive and most practical choice of the three. Hiring a professional could be considered the most hassle-free and less expensive compared to buying a new piece of furniture. However, the professional repair cost may still vary depending on the furniture material and the severity of the damage. Lastly, replacing your furniture may be the option that you want to take the least. Not only is it very unreasonable especially for minor pet damage, but it would also be quite a waste of money and fine piece of furniture. In this section, we will help you decide if DIY repair for your damaged furniture is the right choice.
Can I DIY?
DIY repair can be challenging, but with the right preparations, you can definitely do it. Here are three questions you should ask yourself before diving into your DIY repair project:
1. What are your expectations?
You should be able to set your expectations before doing any DIY repair projects. Gauge yourself if you are flexible enough to accept the DIY repair results that will vary depending on skills, time, and effort you put. To proceed with the DIY process, you have to acknowledge that the results can only be as great as the time and effort that you put in. If what you are seeking is strict quality, seeking professional furniture repair help might satisfy you. However, if you do choose DIY repair, then this guide is here to support you all throughout the repair process to achieve a seamless and cost-effective option to saving your home furniture.
2. Can you put in the time and effort required?
It is imperative that you allow the necessary time and effort needed for your repair project. Any DIY repair project requires a certain amount of time and effort, depending on the severity of the repair. If you think you are ready to exert the extra time and effort, then you should definitely give DIY a go.
3. How severe is the pet damage?
Evaluate first the severity of your home furniture damage with the help of our DIY Repair Meter. After the DIY Repair Meter, you will see the repair time and repair options for each pet damages to home furniture.
Leather scratches are one of the most common damages that pet owners experience. Though leather furniture is very durable, sharp claws from animals can still damage the surface. Since the damage is usually only on the surface, this cosmetic damage can be DIY repaired.
Skill Level Required: DIY Beginner
Average Repair Time: 15 minutes - 3 hours
Repair Options:
Leather Repair Kit: The easiest way is always the best choice! Coconix has a great collection of leather repair kits designed for all leather colors and common leather damages. You can contact our Coconix Support Team to know which repair kit is the most suitable for your repair project. Then, you can skip to the repair instructions for leather pet scratches!
Leather Repair Pens: These are now available in the market but be careful when choosing the right pen color for your leather. Make sure to get the right one as it can make the scratches more visible. Worse, it may look like a child has drawn all over your leather furniture.
Leather Repair Balm: If the pet scratches already covers almost your entire furniture, then it's best to recolor your leather. Coconix also offers leather recoloring balms in Dark Brown, Medium Brown, and Pure Black. If you're not sure if this is the right product for your repair project, you may contact us for repair advice.
2. Leather Chews and Bite Marks
Leather chews and bite marks are also some of the most obvious pet damages that you may encounter. These usually freak out pet owners, but no worries! This type of pet damage to leather can be repaired, especially using the right leather repair kit.
Leather Repair Kit: Coconix leather repair kits include all the materials you will need in repairing this type of damage. You can get professional results with the help of our Coconix Support Team. Grab your kit and skip to the repair instructions for leather chew and bite marks!
Leather Patch: This is an option but is only a temporary fix for your furniture. This is ideal if you have an eyesore pet-chewed spot, no time for repair, and guests are coming over in a day or two.
3. Leather Pet Accidents
Pet urine on leather is pretty severe damage and cannot be repaired yourself. Urine will damage leather deep into its fibers and will leave a pungent odor. It’s best to seek professional help for this type of pet leather accident. For minor pet accidents like dog drooling, a DIY repair is possible, especially for small areas.
Skill Level Required: DIY Pro - Leather Professional
Average Repair Time: 5 hours - 3 days
Repair Options:
Leather Repair Kit: This is only possible if the damaged area is small and inconspicuous. Once you have your kit, you can skip to the repair instructions for leather pet accidents!
Leather Repair Professional: This is the best option especially for large damaged areas. Large areas damaged by pet urine usually have a strong pungent odor and will require the expertise of leather professionals.
FABRIC FURNITURE PET DAMAGES AND REPAIR OPTIONS
1. Fabric Pet Scratches
Fabric pet scratches are also inevitable for pet owners. Cats, especially, love making fabric couches as their scratching pads. Good thing, these types of fabric damages can be DIY repaired.
Skill Level Required: DIY Beginner
Average Repair Time: 15 minutes - 1 day
Repair Options:
DIY Fabric Repair Kit: This is the most effective way to repair furniture scratches. You can easily cover up any scratch or scuffs using the fabric glue and repair fibers included in the kit. You can even match your furniture's color since you have 9 colors to mix! You can skip to the repair instructions using this kit.
Ice cubes: This is to wet the furniture fibers slowly, allowing them to soak up the moisture as the cubes melt. Then, use a wide-toothed plastic comb or with the edge of a plastic gift card to comb the area after letting it sit overnight.
Vacuum: Some fibers get back up to their original positions by just vacuuming the scuffed or indented area.
Steam: There are furniture fibers that are stubborn and the two previous methods might not work. Use a steam, damp lint-free, white cotton cloth and place it over the scuffed area. Then, iron the cloth with a clothes iron. Leave the cloth for hours and wait for it to dry.
2. Fabric Chew Marks
Fabric chew marks are usually medium to large-sized damages that are caused by big dogs. These sizes might make you think that professional help is the only choice. However, with the right fabric repair kit, you can definitely DIY repair it.
Skill Level Required: DIY Intermediate - DIY Pro
Average Repair Time: 1 hour - 8 hours
Repair Options:
DIY Fabric Repair Kit: Although this is more severe damage, you can repair it easily with the help of Coconix fabric repair kit. You don't have to worry about your furniture's color since you have 9 colors to mix! Grab a kit and then skip to the repair instructions using this kit.
Fabric Patch: This method is done by carefully cutting out the edges of the damaged area and replacing it with a patch of donor fabric of the same size. This will require sewing if you want a stronger hold.
Superglue: This method is used for pet damages that have depression in the fabric. Find and cut some excess fabric from an inconspicuous area and prepare fillers like foam or cotton batting. Fill in the depression using foam or cotton batting. It is recommended to use fabric glue to attach the fillers. Then apply a thin layer of superglue and carefully place the excess fabric that you cut from an inconspicuous area over the damaged area.
3. Fabric Pet Accidents
Fabric pet accidents are tedious work but can be DIY repaired. You will first have to remove the odor completely before you can move on repairing any stains that have been left by the urine or vomit.
Skill Level Required: DIY Intermediate - DIY Pro
Average Repair Time: 3 hours - 3 days
Repair Options:
DIY Fabric Repair Kit: You can definitely use this after getting rid of the urine or droll odor. This kit will help you cover up any discoloration caused by the pet accident. You can skip to the repair instructions using this kit.
Furniture Cover: This is only a temporary fix to cover pet accidents. This doesn't get rid of any pungent odor or remove the discoloration caused by it.
Fabric Furniture Professional: For severe pet accidents, you may have to reupholster your furniture or seek the help of fabric furniture professionals.
WOOD FURNITURE PET DAMAGES AND REPAIR OPTIONS
1. Wood Pet Scratches
Pet scratches are usually found on chairs and table legs or bottom areas of wooden furniture. These are far from human sight but can still be unsightly. This type of wood furniture damage can be repaired easily.
Skill Level Required: DIY Beginner
Average Repair Time: 15 minutes - 3 hours
Repair Options:
Wood Repair Kit: This is a must-have for pet owners who have a lot of wooden pieces of furniture at home. You can easily fix any pet damage in just under $20! Grab your kit now and skip to the repair instructions using this kit. You can also contact our Coconix Support Team for personalized advice on your repair project.
Furniture Anti-Scratch Sprays: This is only to stop your pets from further scratching your furniture but it does not repair the previously damaged areas.
2. Wood Chew and Bite Marks
Dogs love to chew on furniture legs. This type of damage, though it may look severe and hopeless, can definitely be DIYed.
Wood Repair Kit: This is a must-have for pet owners who have a lot of wooden pieces of furniture at home. You can easily fix any pet damage in just under $20! Grab your kit now and skip to the repair instructions using this kit. You can also contact our Coconix Support Team for personalized advice on your repair project.
Wood Putty: This is just your average wood putty available in your local hardware stores. You may have to choose a wood putty that will match your wood color.
3. Pet Accidents on Wooden Furniture
Pet accidents on wooden pieces of furniture happen rarely compared to pet accidents on hardwood floors. Pet accidents on wooden furniture are usually experienced by male dog owners since male dogs sometimes pee on furniture legs or bottom areas of cabinets, stairs, or drawers to mark their territory. Since urine can penetrate and destroy wood fibers, you must seek the help of professionals for this type of furniture damage.
Skill Level Required: Wood Professional
Average Repair Time: N/A
Repair Options:
Wood Professional: This type of damage will require the help of wood professionals. This is to avoid any further damage to your wooden piece of furniture.
Cons of DIY Repair
Let’s start with the bad news first. There are three disadvantages that you should consider when doing DIY furniture repairs:
1. Time and Energy Consuming
As we always remind DIY beginners, DIY repairs are time-consuming and will require a certain amount of energy and effort. This is if you want to get the best results possible by yourself. You will have to allot a day or two to complete a DIY repair project. This includes preparation time, repair process, drying time, and finishing touches. For bigger repair projects, you may have to allot more than two days as bigger damaged areas may require more drying time and more layers of repair compound.
2. Repair Results May Vary
Because the time and effort allotted depend on you, results may vary. Skill level or experience level may also affect the outcome of the repair. But for DIY beginners, do not be disheartened. With enough preparation, research, this ultimate DIY repair guide, the right DIY repair kit, and our support and advice, you can and will definitely get the best results possible.
3. Unexpected Consequences
There are times that things don’t go as planned. You should always set your expectations and evaluate how much extra cost and extra damage you can accept if your DIY repair doesn’t go as planned. You also have to really weigh up the pros and cons of DIYing it. Your expectations should be based on realistic factors as this will help you avoid disappointments and frustration when things go wrong.
Pros of DIY Repair
Of course, it’s not always bad news. There are also pros that come along with DIY furniture repairs:
1. Learn A New Skill
Doing DIY repairs will make you skillful and knowledgeable in DIY projects. It will also make you confident in doing home repairs on your own. This is recommended if you want to be independent and practical when it comes to maintaining your home and home furniture.
2. Experience Convenience
When you encounter furniture damages, it’s very handy to have your DIY repair kit ready to use. It’s also very convenient to know what to do when you experience any home furniture damage.
3. Save Money
Not only is it very convenient, but DIY repairs would also help you save money compared to professional furniture repairs. We will go into detail about the DIY repair costs versus professional repair costs.
DIY Repair Cost Vs Professional Repair Cost
You will be able to evaluate the costs of your furniture repair using the cost table below. This table will hopefully help you gauge if you prefer the low DIY repair costs or if you are ready for the pricy professional repair.
How much does it cost to have your home furniture repaired by a professional compard to DIY repair costs?
Once you have decided and evaluated your furniture repair costs, you can now proceed to the next sections where we have listed in steps the DIY repair process for each damage type under each furniture category.
SECTION 3: How to Reduce Pet Damage on Your Furniture
After looking into your pet’s behavior itself, you can now proceed to the next step: reduce the damage they deal by making your home pet-proof and add protection to your home furniture.
Build a Pet-Friendly Home
1. Provide scratching posts and pads.
This can be very helpful especially for cat owners. Scratching also helps cats stay in shape as a form of exercise and gives them the chance to mark their territory through scent glands in their feet.
2. Invest in pet toys.
Buying pet toys like treat-dispensing toys, chew toys, and other toys that they can play with while you’re gone. This way, they won’t get bored and target your new leather sofa or your classy coffee table.
3. Litter box is a must.
If you don’t want your pet peeing and pooping all over the place, train them to do these things on a litter box. Make sure that you put these in the right places.
4. Choose stain-resistant fabrics.
There are stain-resistant fabrics like the Crypton—a nearly indestructible, synthetic fabric that's resistant to stains, smells, bacteria, and muddy paws. Investing in this type of fabric would save you hundreds to thousands of dollars for repairs that may encounter with scratch-prone fabrics.
5. Design your home according to your pet’s lifestyle.
If you have the money and time, you can design your home according to your pet’s lifestyle. For dogs who like to run in the backyard and come into the house with their muddy paws, building a pet room near an animal entry would help you keep them from running and mudding the entire place. Animal rooms can have an area where you can wash and wipe their paws first.
For pets who love to spend their time on the couch or bed, use washable fabrics and cover the area where they usually hang. This will help avoid ruining your furniture when they have accidents.
For dogs and cats who love to stay indoors, you might want to skip wall-to-wall carpet. Choose small carpets instead as this will make cleaning easy when they have accidents.
If you have big dogs who can’t control their weight and are very playful indoors, choose ceramic tiles as this material is easy to clean and resistant to any stain an animal can dish out. Ceramic tile is toenail-proof, too!
There are numerous ways to pet-proof your home and you can experiment and try things that will work best for you and your pet. Investing in a pet-friendly home is never a bad idea, especially if you are a pet lover.
Tips for Additional Furniture Protection
Aside from making your home pet-friendly, you can also try doing these extra steps to further protect your home furniture.
1. Vacuum often.
Keeping your home clean will help remove any pet odors or scents that they leave. This will also keep your indoors neat and tidy.
2. Bathe and groom your pet regularly.
This is also one way to keep your pet from scratching and clawing. Sometimes, being dirty or having long fur makes them itch resulting in scratching behavior. Also, long claws will definitely ruin your furniture so it may be good to train them for claw trimming.
3. Place clear plastic pet-scratch guards on corners.
Cats love to scratch corners of upholstered furniture so placing clear plastic pet-scratch guards on corners should help in dealing with the damage you get from your cat’s scratching.
4. Use Enzymatic Cleaners to Deal with Accidents
Urine smell, if left unattended in your home, will make your pet think that it’s okay to keep peeing on that spot. Invest in an enzymatic cleaner that can be bought from your local convenience or hardware store. These cleaners contain bacteria that feed on the ammonia and other organic material in pet waste and vomit to effectively and permanently clean odor and stains.
SECTION 4: How to DIY Repair Claw Scratches
Grab your DIY repair kit and carefully follow the instructions below. We strongly recommend that you test all the products first before giving them a go. Check the materials we have listed below and test them first on a small inconspicuous area to make sure that it is safe to use on your furniture surface. We’ll definitely guide you throughout the process and you can contact us anytime during the repair if you have any questions or concerns.
IMPORTANT REMINDER!
Coconix DIY repair kits are safe to use for homes with pets and children. The repair compound does not contain any poisonous ingredients so there is no need to worry. If you ever encounter any issues with the product, we guarantee that you can always contact us anytime during the repair if you have any questions or concerns.
DIY REPAIR METER:
Claw scratches can be repaired through DIY repair according to the DIY repair meter below.
Cotton swab/cotton pad (Alternative: Clean rag or cloth)
90% rubbing alcohol (Alternative: Water and mild soap)
Coarse to medium (60-150) sandpaper (for bumpy damages)
Fine brush, toothpick, or any fine applicator (for finer applications)
Nail polish remover (Alternative for alcohol when buffing)
STEP-BY-STEP PROCESS:
1. Prepare the damaged area.
It is crucial to remove all grime and dirt before starting the repair as the repair compound won't adhere well on a greasy surface and might flake off over time. Thoroughly clean the area to be repaired and its surrounding with a cotton swab or a cotton pad and 90% rubbing alcohol. Soak the cotton pad or cotton swab with 90% rubbing alcohol and gently apply it to the damaged area. Please firstly test the rubbing alcohol on an inconspicuous area to check that it doesn’t remove the color of your leather and proceed carefully. You may use water and mild soap as an alternative if the alcohol damages the surface. Soak a clean rag or cloth with a mild soap mixed with water. Make sure that all the loose dust, dirt, and grime has been removed first.
There are some cases when you will have to lightly sand the damaged area to make it flat and smooth before the repair compound application. This is required when there are bumpy edges of cracks or surface scratches that look etched. Anything that is bumpy, curling, or jagged has to be lightly sanded. Otherwise, it will stay bumpy and elevated after being repaired.
2. Match your leather color.
In order to completely blend the repaired spot, you will need to match the color of your leather or vinyl. It doesn’t have to be a perfect match but making it a very close match will help you get the best-looking professional repair results. Work during the daytime so that you can clearly see the color of your leather or vinyl and compare it with the colors of the repair compounds available in your leather repair kit. If your leather color is one of the most common leather colors like black, tan, burgundy, cream, chocolate, or walnut, then you may be able to use one of the repair compounds straight from the tube. But if you have a little unique or complex leather color, you may need to mix two or more colors in order to achieve a close match. This step in the repair process can be a bit tricky and challenging but do not forget that you can always contact us if you need more tips, we are more than happy to provide personalized advice for your color matching! You can also check out our blog article for frequently requested color mixing recipes and you might find there your leather color match!
For complex leather colors, decide first which will be your main color. Then, select your secondary colors based on the tint that your leather needs. Looking at your color mixing guide will greatly help you in the color matching process! This color mixing guide should be included in your leather repair kit but if you did not find this in your kit, please contact us so we can send you your own copy! You can also download it for free for quicker access. Once you have your main and secondary colors, carefully mix them in the mixing jar. We recommend adding only very tiny hints of each color at a time as a little amount goes a long way. You may adjust the shade of your color mixture by adding white or black repair compounds. Try your mixture on a small, inconspicuous area and wait until it fully dries. Please be patient and make small adjustments until you get the color just right.
3. Apply a thin layer of compound.
After matching your color, apply a thin layer of the repair compound to the damaged area. For this step, you will need the spatula or the brush included in the kit to evenly apply your color mixture. If you need to do finer applications, especially for smaller and more intricate damages, we recommend using a toothpick, a fine brush, or any fine applicator that is suitable for your repair.
4. Allow the compound to dry for several hours.
Drying time depends on the thickness of the applied layer and the relative humidity of the environment. It usually takes a few minutes to an hour for small repairs to completely dry. For medium to large repairs, it may take an hour to a few more hours for the repair compound to fully cure. When doing your repair project, the temperature should be above 50°F ideally.
For these types of damage, it usually only requires 1-2 coats of the repair compound to completely cover the damage. However, for some cracks or small punctures, you may need to apply multiple thin layers to rebuild the damaged area until it is level with the surrounding area and completely covered. Please allow drying time between each layer application. The repair compound is not only paint, but it also contains leather filler and adhesive and dries to a leather-like finish. The repair holds very strong, often outlives the actual material.
If you encounter any drying issues with your repair project, try the next step immediately. If the next step does not solve your issue, please contact us right away and send a photo of your repair’s current state.
5. Buff and blend the repaired spot.
When the repair compound is dry, use a cotton pad or a cotton swab with 90% rubbing alcohol to buff the edges. Carefully blend the edges of the repaired area to match it with the rest of the leather. Buffing it with alcohol will also remove any stickiness or tacky feel left in the repaired area.
If 90% rubbing alcohol does not remove the stickiness or tacky feeling, check the rubbing alcohol you are using. Please make sure the alcohol is not expired, as it affects the outcome. Alternatively, you may use nail polish remover. We recommend using a cotton swab to carefully rub the repair compound only, as the nail polish remover may remove the color of your leather.
Prepare the damaged area by trimming off loose threads or jagged bits and cleaning it with a household cleaner.
2. Mix and shake.
Fill the color fibers into the empty jar. Add the metal ball into the mixing jar, screw the lid on, and shake the jar for at least 30 seconds. Remove the metal ball and secure the mesh to the jar with the rubber band to create a sifter.
3. Apply a thin layer of glue.
Apply the glue to the damaged area, and work from the outside to the center to avoid air bubbles. Fill the damaged area as evenly as possible. Also, apply a thin layer of glue around the damage to blend in the repair.
4. Sift the repair fibers.
Hold the mixing jar above the adhesive upside down and gently tap the mixing jar. This will sift the fibers on the adhesive. Cover the fabric glue completely with fiber. Gently pack down the fibers with the spatula. Duplicate any fabric patterns such as lines or swirls with the spatula.
5. Let the area dry.
Allow 24 hours to dry. Once the fabric glue is fully dry, blow off excess fibers. If the repaired area gets hard wear, you can protect it by spraying a clear hairspray over the area.
Fine brush (if the included brush in the kit is not refined enough)
Paper towel
STEP-BY-STEP PROCESS:
1. Clean and remove any debris.
Start by cleaning the damaged area and removing any debris. Wipe it down with a damp cloth and let it dry thoroughly.
2. Apply and smooth out.
Apply the repair compound to the damaged area. Use the spatula for larger applications and the brush for surface applications and detail touch-ups. Use a fine brush of your preference if the brush in the kit is too big for details and grain pattern creation. Smooth out the surface and wipe off the excess with a paper towel.
3. Allow dry time.
Allow several hours to dry until the repair compound is no longer sticky to touch. If needed, apply additional layers until the repaired area is flush with the rest.
SECTION 5: How to DIY Repair Chew and Bite Marks
Playful bites often lead to eyesore damages on our home furniture. Feel free to skip to the repair instructions for chew and bite marks on leather furniture, on fabric furniture, or on wood furniture.
DIY REPAIR METER:
Chew or bite marks of pets on your home furniture can be repaired through DIY furniture repair according to the DIY repair meter below.
Cotton swab/cotton pad (Alternative: Clean rag or cloth)
90% rubbing alcohol (Alternative: Water and mild soap)
Any sturdy fabric such as canvas or denim (if the repair requires more)
STEP-BY-STEP PROCESS:
1. Trim the surrounding jagged or curling edges.
Prepare the damaged area by trimming any jagged bits, curling edges, or excess threads with scissors, cutter, scalpel, or a knife. Next, please clean the area with a cotton swab or a cotton pad and rubbing alcohol. Please check first if the rubbing alcohol removes the color of your leather and proceed carefully. Use water and mild soap as an alternative for cleaning if alcohol removes the color of your leather.
2. Determine if the backing fabric is needed.
If the chewed hole has also damaged the backing material of your leather, then you will have to use the backing fabric included in your repair kit. You can also use any sturdy fabrics like denim or canvas. If the backing of your leather is still intact, please skip this repair step.Cut out a piece of backing fabric with rounded edges and larger than the hole. Carefully insert it into the hole with the help of the spatula. Make sure that the backing cloth is flat and positioned in the right place. The backing fabric will hold the repair together and help keep it strong and intact over the years.
3. Match and fill the hole.
For the damaged spot to be less of an eyesore, you need to find the closest color match to your leather. After matching your color, please fill the compound under and along the edges of the hole to ensure that the backing fabric is glued well into position. If your repair did not require a backing fabric, please fill the compound directly into the hole. Work your way from the outside to the center of the hole and level the surface. Be particularly careful as to avoid getting too much compound onto the intact material.
4. Rebuild, dry, and blend.
Allow the compound to dry for several hours. You may need to apply multiple layers to rebuild the damaged area until it is level with the surrounding area. Please allow dry time between each layer application. When the compound is dry, use a cotton pad or a cotton swab with 90% rubbing alcohol to buff the edges. Blending the repaired area in with the rest of the leather will help make the treated area almost or completely disappear.
Prepare the damaged area by cleaning it with a household cleaner. If padding is missing and the area under the damage is depressed, insert cotton balls or cotton batting and spread evenly.
2. Insert backing fabric.
Cut out a piece of backing fabric with rounded edges, larger than the damaged area. Insert the backing fabric with the help of the spatula.
3. Mix your repair fibers.
Fill the color fibers into the empty jar. Use the main colors or mix and match the right color for your project with the help of the color matching guide included in the kit.Add the metal ball into the mixing jar and shake well. Remove the metal ball and secure the mesh to the jar with the rubber band.
4. Apply the fabric glue.
Apply the glue to the damaged area, under, and along the edges. Fill the damaged area as evenly as possible. Also, apply a thin layer of glue around the damage to blend in the repair.
5. Sift or pack down the repair fibers.
Hold the mixing jar above the adhesive upside down and gently tap. Cover the fabric glue completely. Gently pack down the fibers with the spatula. Duplicate any fabric patterns such as lines or swirls.
6. Allow dry time.
Allow 24 hours to dry. Blow off excess fibers. If the repaired area gets hard wear, you can protect it by spraying a clear hairspray.
Prepare the area by carefully removing paint chips, splinters, and debris. Wipe down the area with a damp cloth and let it dry thoroughly.
2. Fill the gap with wood putty.
For cracks or chips wider and deeper than 1/4 of an Inch, first, use the wood putty to fill the gap. Cut off the required amount of wood putty and knead it to a uniform color. Apply within 2 minutes after kneading. Press the putty firmly until curing is noticeable. Do not leave a bulge. For a smooth surface, rub the area with a damp cloth prior to hardening. After 1 hour, wood putty can be sanded, tapped, and drilled.
3. Mix and apply the repair compound.
Match your wood color using your DIY repair kit color chart. Then, apply the repair compound to the damaged area. First, apply it along the edges and work from the outside to the center to avoid air bubbles. Use the spatula for larger applications and the brush for surface applications and detail touch-ups. Smooth out the surface and wipe off the excess with a paper towel.
SECTION 6: How to DIY Repair Pet Accidents
Pet accidents on furniture are one of the hardest furniture damages that you may encounter. These accidents will not only damage the appearance of your furniture but will also leave a pungent smell, especially if not handled correctly. Carefully read the instructions below to repair this type of furniture damage.
DIY REPAIR METER:
Pet accidents on furniture require expert help however for leather and fabric furniture, there are still cases when you can DIY repair the pet accident damage.
Pet urine on leather needs professional repair help. However, there are minor pet accidents like a dog drooling that can be DIY repaired. A dog’s drool can leave a stain or discoloration on your leather. You can try the steps below to DIY repair your leather furniture.
Cotton swab/cotton pad (Alternative: Clean rag or cloth)
90% rubbing alcohol (Alternative: Water and mild soap)
Sponge, cotton applicator, or fine brush
Nail polish remover (Alternative for alcohol when buffing)
STEP-BY-STEP PROCESS:
1. Clean and remove grime and dirt.
Since you are working on the surface of the leather, this step is a very important part of the repair. Carefully and thoroughly clean the damaged area with a cotton swab or a cotton pad and rubbing alcohol. Please first check if the rubbing alcohol removes the color of your leather and then proceed carefully. If the leather color is affected by alcohol, please only use water and mild soap when cleaning. Make sure that the spot to be treated has been thoroughly cleaned as it will help the repair compound adhere well to the leather surface.
2. Mix, match, and adjust your color mixture.
Your goal for this repair project is to “get the color back” of the faded, bleached, discolored, or stained spot. So, you will have to spend more time matching the color of your leather. We recommend trying your color mixture first on a small inconspicuous area and waiting for it to dry. This way, you will know what colors to add and if the shade needs to be adjusted by adding hints of black and white to your color mixture.
3. Apply and let dry.
After matching your color, please use any type of applicator, such as a sponge, a cotton applicator, or a brush to apply a thin layer of compound to the discolored area. Make sure that you are careful when applying each of the layers, as you are working on the leather surface and you wouldn’t want to create a bumpy or elevated spot by using too many layers of the repair compound. Allow the compound to dry for several hours. When the compound is dry, use a cotton pad or a cotton swab with 90% rubbing alcohol to buff the edges.
Prepare the damaged area by trimming off loose threads or jagged bits and cleaning it with a fabric stain and odor eliminator. Try your best to remove as much stain as possible and eliminate the odor completely.
2. Mix the fibers.
Fill the color fibers into the empty jar. Add the metal ball into the mixing jar, screw the lid on, and shake the jar for at least 30 seconds. Remove the metal ball and secure the mesh to the jar with the rubber band to create a sifter.
3. Fill the damaged area.
Apply a very thin layer of glue to the damaged area. Fill the damaged area as evenly as possible.
4. Sift the repair fibers.
Hold the mixing jar above the adhesive upside down and gently tap the mixing jar. This will sift the fibers on the adhesive. Cover the fabric glue completely with fiber. Gently pack down the fibers with the spatula. Duplicate any fabric patterns such as lines or swirls with the spatula.
5. Allow dry time.
Allow 24 hours to dry. Once the fabric glue is fully dry, blow off excess fibers. If the repaired area gets hard wear, you can protect it by spraying a clear hairspray over the area.
Pet Accidents on Wood Furniture
For pet accidents on wooden pieces of furniture, it will be necessary to seek professional help. Dog/cat urine can still penetrate the wood, resulting in discoloration and an ammonia-like stench and it is almost impossible to get rid of the smell.
SECTION 7: 5 Must-see PAWsome Pet Damage Repair Results!
Below are some inspirational DIY pet damage repair results that will amaze you! These are repair results after using Coconix DIY repair kits and these happy customers have also consulted our Coconix Team for repair advice. Our Coconix Team is ready 24/7 for your repair inquiry and will be happy to help you throughout the process! They leave and breathe these things!
★★★★★
Leather Furniture Repair Results
1. “Surface scratches fixed”
by April Kelly Wright on Aug 10, 2019
“*glares at fuzzy a-holes with champagne tastes* This worked a lot better than I expected. I mixed up 3 of the colors to get a very good match and then rubbed it into the leather with my finger. It dries pretty quickly, so I immediately wiped off the excess with a slightly damp paper towel. I can’t speak to deep cuts but for surface scratches or cat incidents, it did very well.”
2. “It really works”
by Stine on May 27, 2020
“My cat scratched up the faux leather chair and then my son picked at it and created a big hole. I wasn’t too thrilled as it is not an old chair. So I found this kit. I only mixed two color samples and tried on the back of the chair. If I were my usual perfectionist self I could do a perfect job. But I did it with the second color sample and on the first try as I didn’t have a ton of time. And it came out great! It’s just so much better and takes away the eye sore. I had no issue with stickiness. I did not use the backing on the hole as it would have made it stick up. I did just two coatings and used an alcohol swab to smooth it out. I know it’s visible but it’s not bad at all. I doubt anyone that sits on the chair would look at it and notice it. It’s easy to use. I recommend this. It saved me an ugly patch or a new chair!”
3. “Great product!”
by Dawn on Jul 18, 2020
"I had 2 leather chairs arms that my dog would drool on while looking out the window. I never thought dog drool would burn a hole in leather. I thought they were beyond hope and just put a cover over the arms. ( I put an old piece of leather under the bigger one to protect the stuffing). I used Coconix and you can see the results. I’m pleased with how well it did considering how ugly the holes were. I also used the chocolate color on my husbands Lazy Boy that was showing some cracklings and had scratches. It matched perfectly. Great product, easy to use. Also, if you get some on your hands, hand sanitizer (made with rubbing alcohol) takes it off. Everybody has some of that on hand these days.”
★★★★★
Wood Furniture Repair Results
4. “Great stuff!!!”
by Amazon Customer on Dec 28, 2020
“Great I bought this products because my puppy chewed out my furnitures. See results wort the money highly recommended”
★★★★★
Fabric Furniture Repair Results
5. “Take advantage of their help to insure good success.”
by Steppen Wolf on Dec 17, 2020
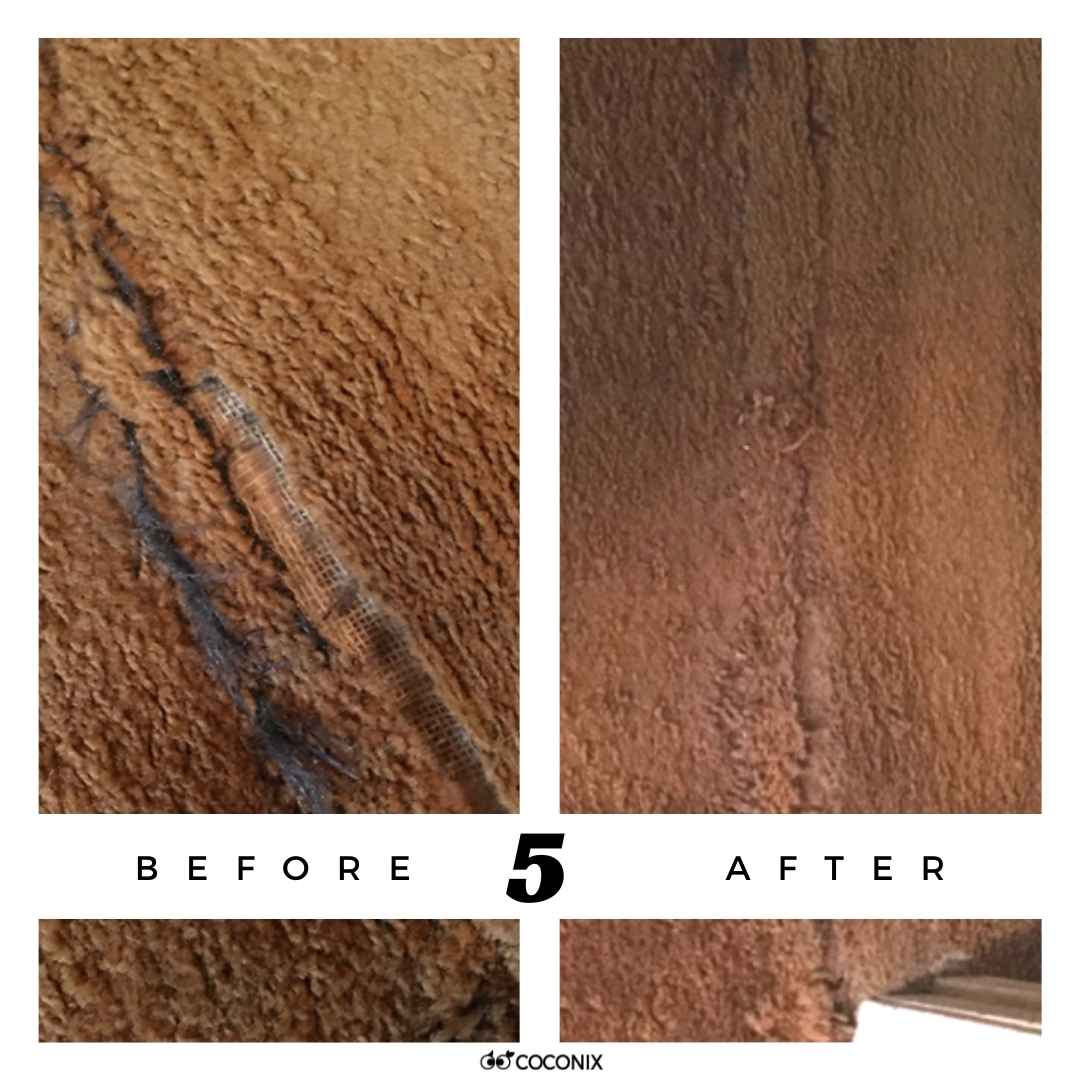
“The company contacted me by email shortly after ordering offering to give advice on how to use their product. I sent a picture and they made recommendations on the mixture of colors to match my carpet and simple instructions. The recommended mix gave me a starting place and came out pretty good after few adjustments. Do be sure to apply a thin layer of glue, I suspect the reviews that complained about darkening May be due to too much glue. Also, the instructions say to pat down the fibers but really just barely smooth over the surface where you applied the fibers, a little too much pressure can bring the glue to the surface. The company was very helpful, contact them..Attached are before and after pictures of about 10” damaged caused by dog who didn’t want to be in a room with the door closed. The channeled damage needs a little more filling or product which is on its way.”
These before and after images and happy reviews are only some of the many successful pet owners and now DIYers who have fixed their furniture pet damage. We are always ready to help you so you can also be one of them!
Pet damages are not something that is hopeless. Hopefully, this DIY furniture pet damage repair guide will help you prepare, execute, and succeed in your DIY repair project. As we always say, the Coconix Team is happy and ready to help you deal with your dog or cat’s pet damage.
SECTION 8: BONUS! 6 Things Only Pet Owners Understand (And How We Deal With It)
Pet owners know and experience almost the same things. Check out our bonus infographic below that you will surely relate to!
Coconix Learning Hub
Get ultimate repair guides, step-by-step video tutorials, free repair eBooks, and more!
Tired of Throwing Things Away?
Join the Coconix Repair Hub – It’s Free!
Learn how to save money, rescue your favorite items, and transform old into new.
Get expert tips, step-by-step tutorials, and creative repair ideas delivered to your inbox.